In today’s post, our AI & core programmer, Tomas Dzamko, will take you through the typical issue of any game, and that is teaching AI agents (enemies) to navigate the environment. Read on to delve into detailed and quite technical description on how this is done in Vaporum.
Pathfinding is the most common problem a game developer has to solve in almost any game. The standard A* (A-star) algorithm has changed over the years and various more sophisticated variants are used in today’s games to achieve better performance, or simply to better fit a specific game. In Vaporum, as in other dungeon crawlers, we need to use a pathfinding system for enemies to be able to follow and attack the player.
Three steps to shortest path
The whole problem of finding the shortest path consists of several steps:
- Creating a space through which the AI agents will navigate. This space, also called pathgraph, holds information about which points the AI can go through without colliding with obstacles. It’s basically a classical graph where vertices are positions where the AI should be able to get to and edges are connections it will use to do that. There are many ways of representing this space. Most common are grids, polygonal maps, navigation meshes, etc. Connections can be uniform (equal distance) or non uniform (varying distance); and the distance can be whole numbers or floats.
- The algorithm itself to calculate the shortest path in the pathgraph between two vertices (points, nodes, …). Here, you can either use the Dijkstra algorithm, the general Breadth-first search or the A*. This algorithm is usually modified for performance, by either specifying more narrow data structures, by defining an estimation in the heuristic function, or by a pre/post process in the form of creating various jump points or space division.
- The result of the algorithm, basically the shortest path between two vertices. Again, this resulting path can be represented in various ways: a linked list of vertices, a list of waypoints (not the whole path), and in some cases the list is modified according to the length of the path, so not the whole path is returned, etc. Everything depends on the specific game, number of AI agents, obstacles, size of units, etc.
How it’s done
Now, let’s see how we go about pathfinding in Vaporum. So, according to point 1, we need a space in which the AI will navigate. Our game is a dungeon crawler, where both AI and the player moves on tiles of the same size and these tiles comprise a grid (see the picture below).
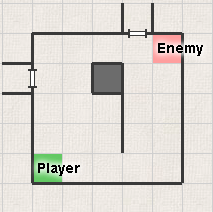
So our pathgraph is a list of AI nodes, where each node has its own position (row, column) in a grid and a list of at most 4 neighbouring nodes, where the node can lead to. To get to a neighbour node, there must be no obstacle on the target tile. However, this is not sufficient, as Vaporum, unlike most other classical crawlers, has so called zero-width walls – walls that do not occupy a space of 1 tile, but are rather positioned between 2 tiles. So, during creating the pathgraph, to determine whether there is a neighbour connection, we do a check for an obstacle and a check for a wall. In Unity3D, we use C# scripts, so the class looks something like this:
public class AINode
{
    // column & row index
    private Ipos m_vIpos;
    // world position
    private Vector3 m_vPos;

    // neighbor AI nodes (max 4, Ipos is up/down/left/right)
    public Dictionary NeighborNodes;

...
}
The function that governs creating the pathgraph then goes through all tiles of the grid in a level and creates these AI nodes, if the AI can enter the node (so basically all tiles with no obstacles anywhere in them). Notice how it is not sufficient to only consider the tiles where the player can enter! We will have flying enemies that can fly over shafts, railings and pitfalls, where the player cannot go!
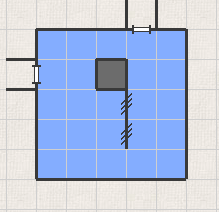
Zero-width walls are also checked, and if there is such a wall between 2 tiles where the AI can enter, then AI nodes are created for both tiles, but the connections are not, and therefore these 2 tiles do not become connected neighbours. The level shown on the first picture would then have the following pathgraph (AI nodes are blue, three crosslines represent 0-width walls with no connection between the nodes):
Now, we get to point 2, which is the A* algorithm to find the shortest path between 2 AI nodes. The complete implementation would unnecessarily bloat the blog post, so we’re not going into such detail.
The basic idea of finding the shortest path in the pathgraph is to move through 1 node per step and in every such step, check for connections to neighbouring nodes, calculate the shortest path from the start node to them, calculate an estimated distance to the target node and record the node we came from, so later we can put together the complete path. It’s nice to know that there is some shortest path, but we need this path to actually be a list of nodes for the AI agent to go through! We need data structures to allow recording such information as quickly as possible, as the A* is quite demanding and can trash the FPS rate significantly.
First, we need to record nodes we’ve already traversed, have calculated paths for and inspected their neighbours. This is a boolean in the AINode class. Similarly, we add both distances to it: 1. from the start to the node, 2. from the node to the end. Lastly, we also record the AINode we came from. The code would look something like this:
public bool Visited;
// distance from start node in pathgraph
public int DistanceFromStart;
// total distance from start to end through this node
public float TotalDistance;
// reference to parent node
public AINode ParentNode;
As we are using a uniform grid and the distance between two neighbouring tiles is always 1, the distance between any two tiles is the absolute value of the difference of their X and Y axis coordinates. This is also called the Manhattan Distance:
function Distance(AINode A, AINode B)
{
    dx = abs(A.x - B.x)
    dy = abs(A.y - B.y)
    return (dx + dy);
}
This is the assumed (heuristic) distance from any node to a target (end) node. “Assumed”, because we do not consider obstacles that can lie on the path and make the real path longer. So now, we have the shortest path from the start node and an assumed distance to the end node. We can store a parent node we came from and we can flag a node as inspected. What is still left to solve is a so called open set, or a list of nodes from which to pick a candidate for inspection.
The open set (or a list of nodes we pick from) defines how we will be searching for the shortest path in the graph. At the beginning, there’s only the start node. Then, neighbours of this node are added, then neighbours of these neighbours are added, etc. If we picked nodes from the open set at random, we would definitely find the shortest path eventually, but it would take too much time, as we would be considering nodes that are more distant and would have to traverse back, calculating the path in vain. That’s why we need to pick a node through which the shortest path goes from the start node to the end node:
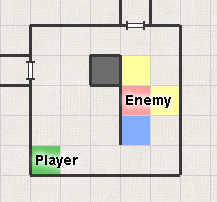
As we can see, the yellow neighbouring tiles would mean a longer path, because they are farther away from the player than the blue neighbouring tile. That’s why it is optimal to pick the blue node, not a yellow one. But both yellow nodes must be in the open set, because if weren’t able to find a path through the blue node, we would have to use one of the yellow nodes! The shortest possible path is not always the shortest possible path in reality!
So to summarize, we need to sort this node list and pick the node with the shortest distance. But if we sorted the list after every step, the whole algorithm would be too slow. The complexity of the sorting is O(n × log n), where n is the number of nodes in the list. The standard procedure is to use a priority queue for this.
We are using a different data structure: a binary heap. The heap works like a binary tree, where the top node has the lowest value and every node’s children nodes have a greater value. An example of a heap:
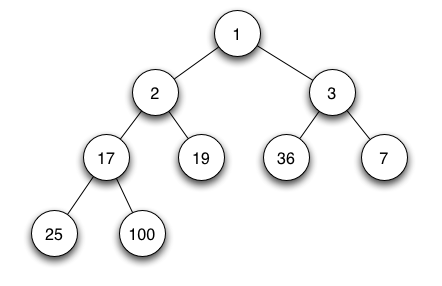 As we can see, the list is not sorted. Only the aforementioned rule applies. But we are perfectly fine with this, as we only need to quickly access the element with the lowest value, while the order is irrelevant.
Unpredictable pathfinding
However, what do we do if more than 1 node have the shortest distance? How to pick the element in that case? In a priority queue, there would be queues after each other at the beginning, so they would be picked in succession. The problem is that this would result in a fixed order, so AI enemies would have very predictable paths. Sometimes, we can see this in dungeon crawlers. If you remember in Eye of the Beholder how you stepped to the right, the enemy would also step to the right and would not go to the other neighbouring tile. This means then that I only step to the right and to the left, while hitting the enemy, and I know exactly where the enemy will go.
The solution is to differentiate nodes with an equal value so that the values are not equal any more in the list, and do this differentiation randomly. We are using an array of random floats (from 0.0 to 1.0), simply picking an element from the array and adding it to the value of the distance by which the nodes are put into the heap. So if 2 nodes have a distance of k, then one can have k + 0.4 and the other k + 0.29, and therefore we can position them in the heap. This number must not exceed 1, which is our distance between two neighbouring nodes in the uniform grid!
So, we’ve learnt to pick the node with the shortest distance, to seek through the pathgraph and flag nodes as inspected, we have the distances from the start and to the end stored, and we also have parent nodes. What is left is constructing the shortest path if the algorithm can find one.
Final shortest path, at last!
When the algorithm finishes, the end node’s parent is the node from which we came to the end node on the shortest path. Analogically, the same goes for this parent node – its parent node is the one that we came here from on the shortest path. By doing this recursion, we can get all the way back to the start node and create a list of nodes that represent the shortest path.
However, as we go from the end node to the start node, the list of upside down. This can be solved in two ways. We either swap the two nodes on the input for the A* (so we are not searching from the start to the end, but vice-versa), or we can use a stack. We are using a stack, so during the recursion, the nodes are simply pushed into the stack. And when the enemy wants to go to the player, it simply retrieves these nodes from the stack (pop operation) and it gets the correct ones.
Conclusion
Pathfinding is just one part of the AI that needs to be programmed. However, it is the very base that must be in place first so we can do any other things regarding AI controlled agents. That’s why it is necessary that this pathfinding is optimal, simple and robust. With having this base functional, we can work on other areas of AI – namely combat, patrolling / idling, using skills, ranged attacks, mass engage (multiple units attacking), player summons, etc.
We hope you liked this insight into how things work in the background of our game. We will be bringing more such information in the future, so stay tuned!
Sorry, the comment form is closed at this time.